
Configurações na BIOS
NOTA: As talas BIOS na seção servem apenas como referência. As telas
reais podem diferir por modelos e territórios.
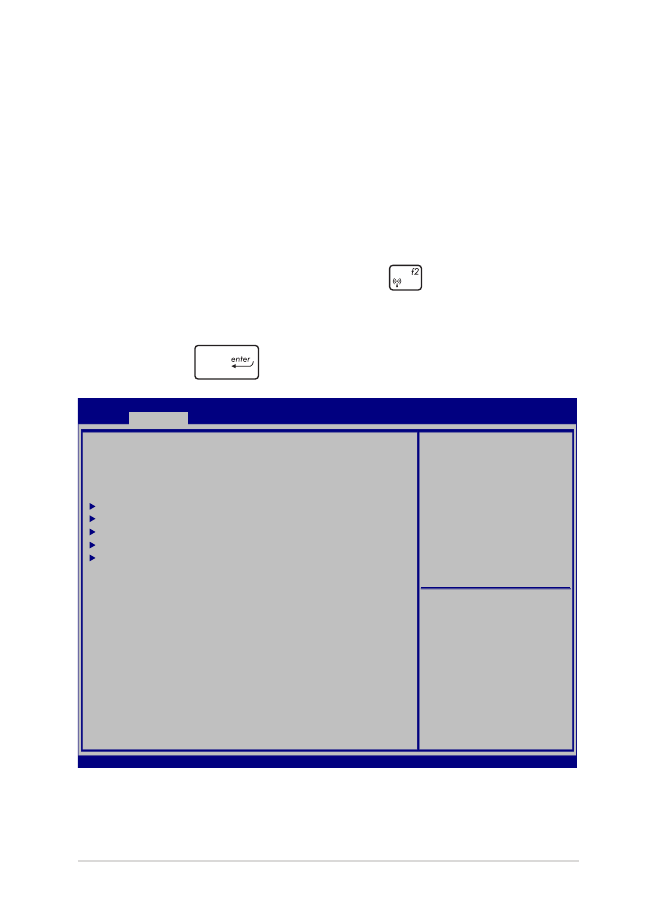
Inicialização
Este menu permite que você defina suas prioridades de opções de
inicialização. Você pode consultar os seguintes procedimentos quando
definir a sua prioridade de inicialização.
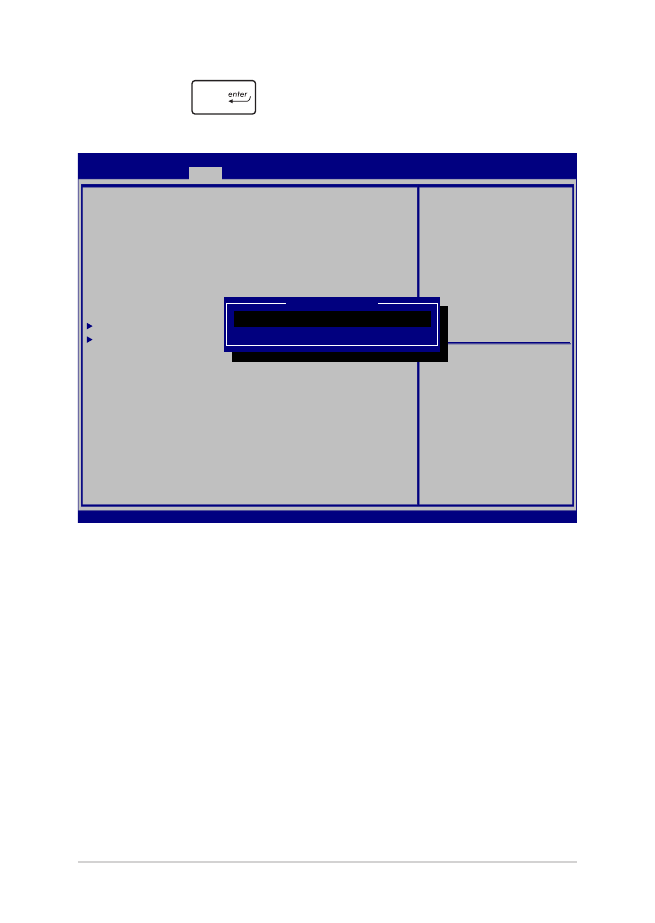
1.
NBA tela Boot (Iniciar), selecione Boot Option #1 (Opção de
Início nº. 1).
Aptio Setup Utility - Copyright (C) 2015 American Megatrends, Inc.
Main Advanced
Boot
Security Save & Exit
Version 2.16.1243 Copyright (C) 2015 American Megatrends, Inc.
Boot Configuration
Fast Boot [Enabled]
Launch CSM [Disabled]
Driver Option Priorities
Boot Option Priorities
Boot Option #1 [Windows Boot Manager]
Add New Boot Option
Delete Boot Option
Sets the system boot
order
→
← : Select Screen
↑↓ : Select Item
Enter: Select
+/— : Change Opt.
F1 : General Help
F9 : Optimized Defaults
F10 : Save & Exit
ESC : Exit
70
E-Manual do PC Notebook
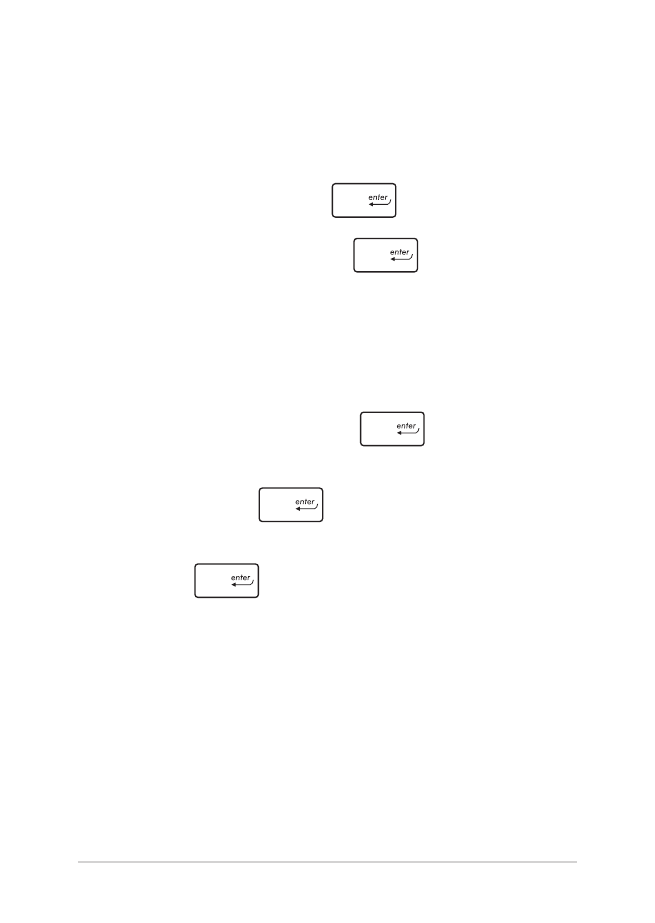
2.
Pressione
e selecione como dispositivo a Boot Option
#1 (Opção de Início nº. 1).
Aptio Setup Utility - Copyright (C) 2015 American Megatrends, Inc.
Main Advanced
Boot
Security Save & Exit
Version 2.16.1243 Copyright (C) 2015 American Megatrends, Inc.
Boot Configuration
Fast Boot [Enabled]
Launch CSM [Disabled]
Driver Option Priorities
Boot Option Priorities
Boot Option #1 [Windows Boot Manager]
Add New Boot Option
Delete Boot Option
Sets the system boot
order
→
← : Select Screen
↑↓ : Select Item
Enter: Select
+/— : Change Opt.
F1 : General Help
F9 : Optimized Defaults
F10 : Save & Exit
ESC : Exit
Boot Option #1
Windows Boot Manager
Disabled

E-Manual do PC Notebook
71
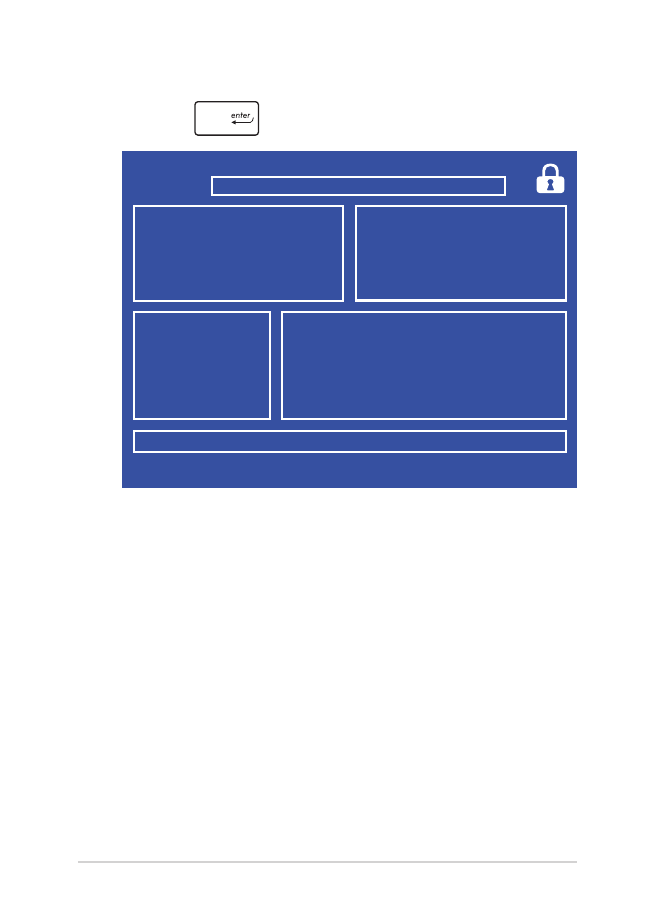
Segurança
Este menu permite configurar a senha do administrador e do usuário
do seu PC Notebook. Também permite que você controle o acesso a
unidade de disco rígido do seu PC Notebook, interface de entrada/
saída (I/O), e interface USB.
NOTAS:
•
Se você instalar uma User Password (Senha de usuário), você será
solicitado a digitar esta antes de entrar no sistema operacional do
seu PC Notebook.
•
Se você instalar uma Administrator Password (Senha de
Administrador), você será solicitado a digitar esta antes de entrar na
BIOS.
Aptio Setup Utility - Copyright (C) 2015 American Megatrends, Inc.
Main Advanced Boot
Security
Save & Exit
Version 2.16.1243 Copyright (C) 2015 American Megatrends, Inc.
Password Description
If ONLY the Administrator’s password is set, then
this only limits access to Setup and is only asked
for when entering Setup. If ONLY the user’s password
is set, then this is a power on password and must be
entered to boot or enter Setup. In Setup, the User
will have Administrator rights.
Administrator Password Status NOT INSTALLED
User Password Status NOT INSTALLED
Administrator Password
User Password
HDD Password Status : NOT INSTALLED
Set Master Password
Set User Password
I/O Interface Security
System Mode state User
Secure Boot state Enabled
Secure Boot Control [Enabled]
Key Management
Set Administrator
Password. The password
length must be in the
following range:
Minimum length 3
Maximum length 20
Must type with character:
a-z, 0-9
→
← : Select Screen
↑↓ : Select Item
Enter: Select
+/— : Change Opt.
F1 : General Help
F9 : Optimized Defaults
F10 : Save & Exit
ESC : Exit
72
E-Manual do PC Notebook
Para definir a senha:
1.
Na tela Security (Segurança), selecione Administrator
Password (Senha de Administrador de Configuração) ou User
Password (Senha de Usuário).
2.
Digite uma senha e pressione
.
3.
Re-digite uma senha e pressione
.
Para limpar a senha:
1.
Na tela Security (Segurança), selecione Administrator
Password (Senha de Administrador de Configuração) ou User
Password (Senha de Usuário).
2.
Informe a senha atual e pressione
.
3.
Deixe o campo Create New Password (Criar Nova Senha) em
branco e pressione
.
4.
Selecione Yes (Sim) na caixa de confirmação em seguida,
pressione
.
E-Manual do PC Notebook
73
Segurança da Interface I/O (entrada/saída)
No menu Segurança, você pode acessar a Interface de Segurança
I/O para bloquear ou desbloquear algumas funções de interface
de seu PC Notebook.
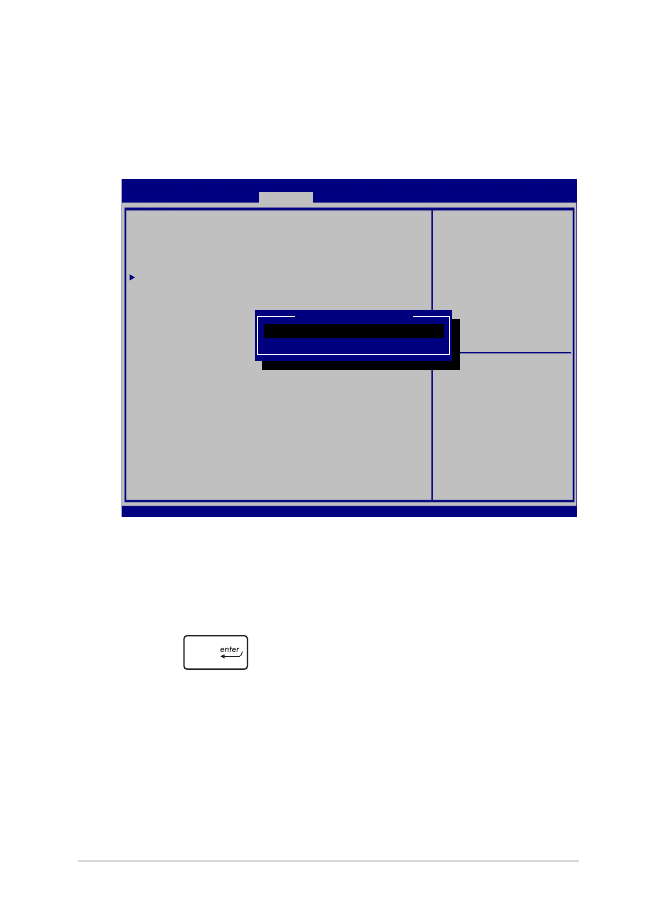
Para travar a interface I/O:
1.
Abra a tela
Segurança
, selecione
Segurança da interface
I/O
.
2.
Selecione uma interface que você deseja travar e clique
em
.
3. Selecione
Lock (Bloquear).
Aptio Setup Utility - Copyright (C) 2015 American Megatrends, Inc.
Main Advanced Boot
Security
Save & Exit
Version 2.16.1243 Copyright (C) 2015 American Megatrends, Inc.
I/O Interface Security
LAN Network Interface [UnLock]
Wireless Network Interface [UnLock]
HD AUDIO Interface [UnLock]
USB Interface Security
If Locked, LAN controller
will be disabled.
→
← : Select Screen
↑↓ : Select Item
Enter: Select
+/— : Change Opt.
F1 : General Help
F9 : Optimized Defaults
F10 : Save & Exit
ESC : Exit
LAN Network interface
Lock
UnLock
74
E-Manual do PC Notebook
Segurança da interface USB
Através do menu Interface de Segurança I/O, você também
pode acessar a Interface de Segurança USB para bloquear ou
desbloquear portas e dispositivos.
NOTA: Definindo a USB Interface (Interface USB) para Lock (Bloquear)
também bloqueia e oculta as External Ports (Portas externas) e
outros dispositivos incluídos na USB Interface Security (Interface de
Segurança USB).
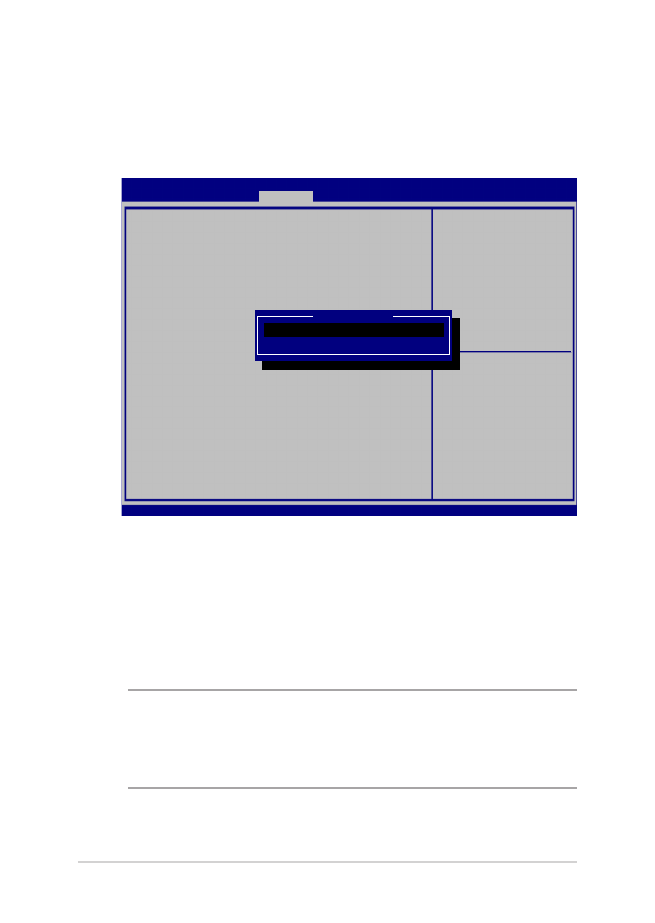
Para travar a interface USB:
1.
Abra a tela
Segurança
, selecione
Segurança da interface
I/O > Segurança da interface USB
.
2.
Selecione uma interface que você deseja travar e clique em
Travar
.
Aptio Setup Utility - Copyright (C) 2015 American Megatrends, Inc.
Main Advanced Boot
Security
Save & Exit
Version 2.16.1243 Copyright (C) 2015 American Megatrends, Inc.
USB Interface Security
USB Interface [UnLock]
External Ports [UnLock]
CMOS Camera [UnLock]
Card Reader [UnLock]
If Locked, all USB device
will be disabled
→
← : Select Screen
↑↓ : Select Item
Enter: Select
+/— : Change Opt.
F1 : General Help
F9 : Optimized Defaults
F10 : Save & Exit
ESC : Exit
USB interface
Lock
UnLock

E-Manual do PC Notebook
75
Para definir a senha HDD:
1.
Na tela
Segurança
, clique em
Definir senha mestre
.
2.
Digite uma senha e pressione
.
3.
Redigite para confirmar a senha e pressione
.
4. Clique em
Definir senha do usuário
e repita as etapas
anteiores para configurar a senha do usuário.
Definir Senha Mestre
No menu Segurança, você pode usar Set Master Password
(Definir senha mestre) para configurar uma senha de acesso
para o seu disco rígido habilitado por senha.
Aptio Setup Utility - Copyright (C) 2015 American Megatrends, Inc.
Main Advanced Boot
Security
Save & Exit
Version 2.16.1243 Copyright (C) 2015 American Megatrends, Inc.
Password Description
If ONLY the Administrator’s password is set, then
this only limits access to Setup and is only asked
for when entering Setup. If ONLY the user’s password
is set, then this is a power on password and must be
entered to boot or enter Setup. In Setup, the User
will have Administrator rights.
Administrator Password Status NOT INSTALLED
User Password Status NOT INSTALLED
Administrator Password
User Password
HDD Password Status : NOT INSTALLED
Set Master Password
Set User Password
I/O Interface Security
Set HDD Master Password.
***Advisable to
Power Cycle System
after Setting Hard
Disk Passwords***
→
← : Select Screen
↑↓ : Select Item
Enter: Select
+/— : Change Opt.
F1 : General Help
F9 : Optimized Defaults
F10 : Save & Exit
ESC : Exit

76
E-Manual do PC Notebook
Salvar e Sair
Para manter suas configurações, selecione Save Changes and Exit (Salvar
alterações e sair) antes de sair da BIOS.
Aptio Setup Utility - Copyright (C) 2015 American Megatrends, Inc.
Main Advanced Boot Security
Save & Exit
Version 2.16.1243 Copyright (C) 2015 American Megatrends, Inc.
Save Changes and Exit
Discard Changes and Exit
Save Options
Save Changes
Discard Changes
Restore Defaults
Boot Override
Windows Boot Manager
Launch EFI Shell from filesystem device
Exit system setup after
saving the changes.
→
← : Select Screen
↑↓ : Select Item
Enter: Select
+/— : Change Opt.
F1 : General Help
F9 : Optimized Defaults
F10 : Save & Exit
ESC : Exit
E-Manual do PC Notebook
77
Problema de software - BIOS:
1.
Verifique modelo exato do PC Notebook depois baixar o arquivo
mais recente do BIOS para o seu modelo no site da ASUS.
2.
Salve uma cópia do arquivo da BIOS baixado para uma unidade de
disco flash.
3.
Conecte a unidade de disco flash para o seu PC Notebook.
4.
Reinicie o seu PC Notebook pressione
durante o POST.
5.
Pelo programa de Configuração da BIOS, clique em Advanced >
Start Easy Flash (Avançado> Iniciar Easy Flash), em seguida,
pressione
.
Aptio Setup Utility - Copyright (C) 2015 American Megatrends, Inc.
Main
Advanced
Boot Security Save & Exit
Version 2.16.1243 Copyright (C) 2015 American Megatrends, Inc.
Start Easy Flash
Internal Pointing Device [Enabled]
Wake on Lid Open [Enabled]
Power Off Energy Saving [Enabled]
SATA Configuration
Graphics Configuration
Intel (R) Anti-Theft Technology Corporation
USB Configuration
Network Stack
Press Enter to run the
utility to select and
update BIOS.
→
← : Select Screen
↑↓ : Select Item
Enter: Select
+/— : Change Opt.
F1 : General Help
F9 : Optimized Defaults
F10 : Save & Exit
ESC : Exit
78
E-Manual do PC Notebook
6.
Localize seu arquivo baixado da BIOS na unidade de disco flash e
pressione
.
7.
Após o processo de atualização da BIOS, clique em Exit > Restore
Defaults (Sair> Restaurar padrões) para restaurar o sistema as
suas configurações padrão.
FSO
FS1
FS2
FS3
FS4
0 EFI
<DIR>
[←→] : Switch [↑↓] : Choose [q] : Exit [Enter] : Enter/Execute
Current BIOS
Platform : GL553
Version : 101
Build Date : Oct 26 2015
Build Time : 11:51:05
New BIOS
FLASH TYPE : Generic Flash Type
ASUSTek EasyFlash Utility
Platform : Unknown
Version : Unknown
Build Date : Unknown
Build Time : Unknown

E-Manual do PC Notebook
79